Select a Heading Style
Before You Start
PRO TIP 1: For the most accurate measurements for curtain lengths and widths, use a steel tape measure. A fabric or plastic tape can stretch over time and will not provide the accurate reading you require to obtain perfect specifications.
PRO TIP 2: Most fabric bolts come in standard widths of 137cm. This means that most non-pinch pleat curtain panels more than 120cm wide and pinch pleat panels more than 50cm wide will have vertical joining hems to achieve the necessary width. These are unavoidable and standard industry practice.
PRO TIP 3: We do *not* require measurements for your windows, frames, poles or tracks. Instead, when ordering from The White Window, please enter the precise final sizes of the ready curtain panels you’d like us to stitch.
PRO TIP 4: Prices on our site are per curtain panel, *NOT* per pair. To get a pair, please purchase 2 units.
PRO TIP 5: If you’re measuring for more than one window, measure each one individually – never assume that your windows are the same size, even if they may look alike.
PRO TIP 6: Refer to our blogs on the different pinch pleat styles for further guidance on measuring for each of them individually and style notes:
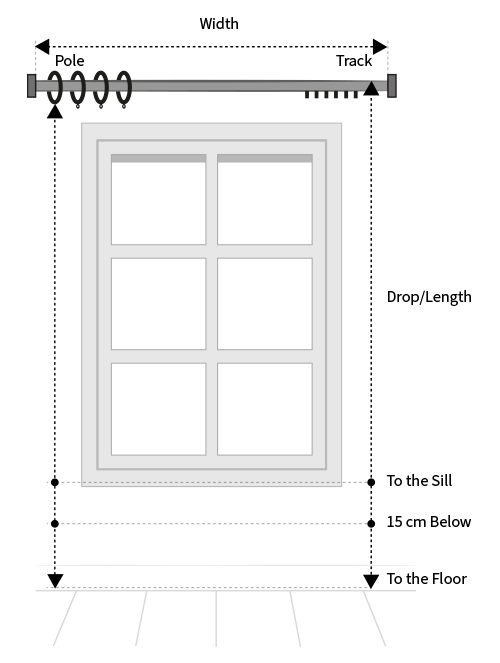
How to Measure Length
If you're mounting your pinch pleat drapes from a decorative pole with rings, and would like the show-worthy hardware to be visible, start measuring length from just below the curtain ring, up to the desired endpoint.
If mounting from a track, most clients prefer to hide the hardware. In this case, we recommend measuring the length from the top of the track to the desired endpoint.
You may choose your drapery to stop at the window sill, or at a recommended length of 10-15cm below the window sill, or even better, as the stylists tout, go for floor-length or puddled drapes that match the tailored look of the style.
Ultimately, the curtain fall length comes down to the taste of each client. While any pinch pleat is best donned in long lengths, one may choose other endpoints based on the space available, or personal preferences.
How to Measure Width
Pinch pleat curtains have ‘fixed pleats’ that are stitched in and cannot be adjusted, therefore, specifying panel widths accurately is quite important. Depending on the kind of hardware you have in place or plan to purchase, the end widths of your panels may vary slightly.
The three key hardware options are curtain tracks, standard drapery poles, and French return drapery poles. Let's go over the steps to measure drapery panel widths taking into account each of these hardware options:
Curtain Tracks/Standard Drapery Poles:
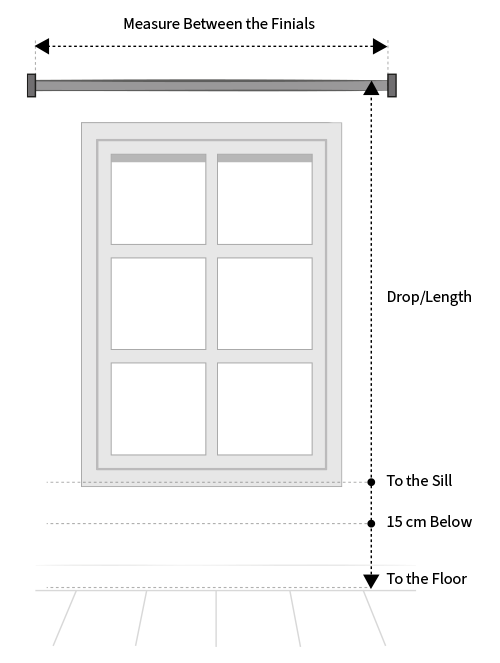
- Measure the length of your track or pole (finial to finial).
- For a single panel, add 10cm to the measured length for the final width. Example: For a 100cm pole/track, the advised pinch pleat panel width is 110cm.
- For a pair of curtains on the same track/pole, add 20cm to the length, then halve the total for each panel. The extra width of 20cm ensures sufficient panel width for curtains to sufficiently overlap when drawn together, thereby preventing any light leaks in the middle. Example: For a 100cm track, the final width for each panel would be (100+20) ÷ 2 = 60cm.
French Return Drapery Poles:
- Measure the size of the pole end to end, including the returns (typically 10cm on each side).
- Follow the sizing guidance for tracks/standard poles, adjusting for the extra 10cm width needed to cover the returns.
How to Hang
Pinch pleat curtains can be hung on both tracks and poles using drapery pins. However, while tracks are more popularly used for modern pinch pleat styles like the Euro pinch pleats, we recommend show-worthy poles with decorative finials for other pinch pleat styles like French pleats or goblet pleats.
Regardless of the hardware you use, follow the steps given below to hang your pinch pleat curtains:
STEP 1: On the backside of your pinch pleat curtains, you’ll find a 10cm wide heading tape sewn at the top. Our heading tape features three different pin insertion points, offering three ‘levels’ to insert drapery pins. This provides the flexibility of being able to choose the exact height you’d like your drapes to sit. Choose the level that you’d like to use for the best possible height/look for your drapery, while factoring in if you’d like your track/pole to be visible or hidden.
STEP 2: Start inserting drapery pins along the entire length of the tape, aiming for one drapery pin behind every ‘pinch’. Ensure that the pins are inserted securely and evenly spaced across the width of the curtain.
STEP 3: Once all the drapery pins are inserted in the heading tape, hook the curved end of the pin into the eyelet of the drapery ring, clip, or track carrier. Ensure that each pin is firmly secured in the hardware to prevent any slipping or sagging of the curtains. And that’s it!
Before You Start
- PRO TIP 1: For the most accurate measurements for curtain lengths and widths, use a steel tape measure. A fabric or plastic tape can stretch over time and will not provide the accurate reading you require to obtain perfect specifications.
- PRO TIP 2: Most fabric bolts come in standard widths of 137cm. This means that most non-pinch pleat curtain panels more than 120cm wide and pinch pleat panels more than 50cm wide will have vertical joining hems to achieve the necessary width. These are unavoidable and standard industry practice.
- PRO TIP 3: We do *not* require measurements for your windows, frames, poles or tracks. Instead, when ordering from The White Window, please enter the precise final sizes of the ready curtain panels you’d like us to stitch.
- PRO TIP 4: Prices on our site are per curtain panel, *NOT* per pair. To get a pair, please purchase 2 units.
- PRO TIP 5: If you’re measuring for more than one window, measure each one individually – never assume that your windows are the same size, even if they may look alike.
- PRO TIP 6: Refer to our blog on Wave Fold Curtains & Window Drapes for further guidance and style notes.
How to Measure Length
Wave pleat curtains can be hung from both tracks and poles, and depending on the kind of hardware you have in place or plan to purchase, the final lengths of your wave pleat curtains will vary.
For curtain tracks, clients prefer to hide the hardware and need to measure from the top of the tracks. Conversely, measure from the underside of your tracks to the desired endpoint if you want the track to be visible.
If you have poles installed, you may hang your curtains with either curtain rings and pins or curtain clips. For both, you need to start measuring the length of your wave pleat curtains from the underside of your curtain rings or clips to the desired endpoint.
As to what the endpoint should be, you may choose between any of the standard sizes of short curtains that stop at the sill or go for long curtains that reach the floor. The choice is entirely personal based on your preferences and requirements.
How to Measure Width
The thumb rule for wave pleat curtains is more width for more pleats.
Wave top curtains don their signature wavy-ripple look with well-formed pleats that are architectural yet minimalist. And the no-fail formula to achieve this aesthetic is to order 2x fullness. What does ‘2x fullness’ mean? Let us take you through the steps to measure panel width and explain.
- Measure the width of your track or pole (finial to finial).
- Double this number for 2x fullness, and it should be the overall width of your wave pleat curtains.
- Example: If the pole is 100cm long, order curtains with a panel width of 100cm each or a single panel close to 200cm.
Adjustments for Sheer Curtains:
- Increase panel width beyond 2x fullness for semi-sheer or sheer curtains.
- Thin, lightweight fabrics need higher width for privacy and fullness.
For a Minimalist Look:
- For a 'flatter' look with shallower pleats, order panels with 1.5x fullness.
- Example: If the drapery pole is 100cm, order a single panel with a width of about 150cm or a pair with 75cm each.
Please note that we recommend not going below 1.5x fullness for wave pleat drapes to avoid a 'stingy' appearance; they may hang like a flat sheet when drawn across the window.
How to Hang
Hardware Options for Wave Pleat Curtains: Drapery pins and rings, curtain clips, or hooks
STEP 1: Mark Pin/Hook Insertion/ Clip Attachment Points
- Use a scale/measuring tape and pencil to mark insertion points.
- Insert your pins/hooks, or attach your clips 17-20cm apart for fuller pleats, or at a distance of 10-15cm for flatter pleats.
- Accurate measurement and marking are non-negotiable to ensure uniform pleats that create the signature wavy contour look of the wave pleat style.
STEP 2: Attach the Hardware & Mount the Drapes
- Insert the pins/ hooks, or attach the curtain clips to the top hem of the curtain following the marked points.
- Hook the curved end of the pin into the eyelet of the drapery ring or track carrier.
- For rings & clips, simply glide the rings onto the drapery pole and if you are using clips with drapery tracks, hook the clips to the track carrier eyelets.
Before You Start
- PRO TIP 1: For the most accurate measurements for curtain lengths and widths, use a steel tape measure. A fabric or plastic tape can stretch over time and will not provide the accurate reading you require to obtain perfect specifications.
- PRO TIP 2: Most fabric bolts come in standard widths of 137cm. This means that most non-pinch pleat curtain panels more than 120cm wide and pinch pleat panels more than 50cm wide will have vertical joining hems to achieve the necessary width. These are unavoidable and standard industry practice.
- PRO TIP 3: We do *not* require measurements for your windows, frames, poles or tracks. Instead, when ordering from The White Window, please enter the precise final sizes of the ready curtain panels you’d like us to stitch.
- PRO TIP 4: Prices on our site are per curtain panel, *NOT* per pair. To get a pair, please purchase 2 units.
- PRO TIP 5: If you’re measuring for more than one window, measure each one individually – never assume that your windows are the same size, even if they may look alike.
- PRO TIP 6: Refer to our blogs on Grommet Top Curtains and Rod Pocket with Header Drapes for further guidance on measuring them individually and style notes.
How to Measure Length
Start by measuring the length from the top of the drapery pole to the desired endpoint. To that figure, add 4cm to account for the ‘upstand’ of the curtains.
The ‘upstand’ is the portion of the curtains that sits above the drapery pole, and in the case of rod pocket with header curtains, the ‘upstand’ is the frill section.
Adding 4cm to the drapery pole length will give you the final length to specify in your order for eyelet/ frill header rod pocket curtains from us. That simple!
As to what the endpoint should be, you may choose between any of the standard sizes of short curtains that stop at the sill or long curtains that reach the floor. The choice is entirely personal based on your preferences and requirements.
How to Measure Width
To achieve a full, sumptuous look for your eyelet curtains and a rich ruffle for your frill header rod pocket curtains, the panel width needs to be stitched with an optimal ‘fullness factor’ of at least 2x. What does this mean? Let us take you through the steps to measure panel width and explain.
Start by measuring the width of your pole, finial to finial. Then, for 2x fullness, double this number. This should ideally be the width of your curtains altogether.
For example, if your pole is 100cm long, then doubling that figure to 200cm, we recommend ordering a pair of curtains with a panel width of (roughly) 100cm each, or a single panel close to 200cm.
This extra width is to ensure that the panels have enough fabric for a rich gather, and do not look sparse or flat like a sheet.
For a more dramatic effect or to accord more privacy with lightweight/sheer fabrics, you can also order curtains with up to 3x fullness. So, for a 100cm pole, that would translate to two panels of about 150cm each.
If you are working on a tight budget, you may go as low as 1.5x fullness resulting in less dense pleats, without compromising your drapery’s elegance heavily, but we do not recommend going lower than 1.5x fullness or the drapery may look too sparse and stingy.
How to Hang
Hanging grommet curtains/ rod pocket curtains are easy as a breeze owing to the stitched-in grommets and drapery pocket.
Simply feed the drapery pole through the rod pocket sleeve or the grommets.
For the eyelet curtains, make sure not to miss any of the grommets or you will have to redo the entire work. Also, keep in mind that returns (edges) of the curtains should be turned inwards towards the wall or window, and not outwards towards you as you position the first grommet. Otherwise, it can result in the fold/pleat direction being reversed, with the back of panels showing on the edges, and light leaking in through the return/edges.
For the rod pocket curtains, even out the drapery gather and adjust the ruffling as desired.
Next, simply put the rod in place and after checking its centring, tighten any screws to secure the pole on brackets and add the finials to complete the equation. That’s it!
Do note that grommet tops and rod pocket curtains can only be hung on curtain rods/ poles.
Before You Start
- PRO TIP 1: For the most accurate measurements for curtain lengths and widths, use a steel tape measure. A fabric or plastic tape can stretch over time and will not provide the accurate reading you require to obtain perfect specifications.
- PRO TIP 2: Most fabric bolts come in standard widths of 137cm. This means that most non-pinch pleat curtain panels more than 120cm wide and pinch pleat panels more than 50cm wide will have vertical joining hems to achieve the necessary width. These are unavoidable and standard industry practice.
- PRO TIP 3: We do *not* require measurements for your windows, frames, poles or tracks. Instead, when ordering from The White Window, please enter the precise final sizes of the ready curtain panels you’d like us to stitch.
- PRO TIP 4: Prices on our site are per curtain panel, *NOT* per pair. To get a pair, please purchase 2 units.
- PRO TIP 5: If you’re measuring for more than one window, measure each one individually – never assume that your windows are the same size, even if they may look alike.
- PRO TIP 6: Refer to our blog on Pencil Pleat Curtains & Window Drapes for further guidance and style notes.
How to Measure Length
Pencil pleat curtains can be hung from either a track or a pole, and your length measurement will vary based on your choice of hardware.
If hanging from a track, panel length should ideally be measured from the top of the track up to the desired endpoint. This will allow for the fabric to cover/hide the track itself. If you’d like your track to be visible, measure from the bottom of the track to the desired endpoint.
Similarly, if you are hanging your pencil pleat drapes from a pole, and would like to show off the hardware, you can design your pencil pleat curtains to hang below the rings. In this case, measure the length from the underside of the rings to the desired ending point. If you want the hardware to be concealed, measure from the top of the pole.
Pencil pleat style suits both short and long curtains. The length may be decided based on your aesthetic preferences, room layout and functional purposes. They may stop at the sill or go all the way down to the floor.
How to Measure Width
The width of the curtains is determined in relation to the width of the window. Pencil pleat curtains should ideally be sewn/purchased with 2x or 2.5x fullness, that is, double or 2.5 times the width of the window.
To explain with an example, if your drapery pole/track is 300cm long, your curtain panels’ width altogether should ideally be 600cm (300 x 2). Then, depending on your personal preferences & needs, you may order two panels of 300cm each, or one single panel of 600cm.
Lightweight fabrics may need an even higher width than 2x fullness to gather into fuller pleats.
To some extent, the exact width to achieve the desired level of fullness is decided by clients based on various factors. But the key principle to remember is that the wider the panel width, the fuller the gather and pleats.
If you’re working with a constrained budget, you may lower the width to 1.5x at the most. But lowering it further is not recommended as it will leave you with a curtain panel that looks almost flat, with no pleats.
How to Hang
STEP 1: Lay down the curtain panel on the table with its rear side facing upward. Pull out the drawstrings on that side, knot them together and insert the loose ends into the header pocket.
STEP 2: Next, hold the drawstrings on the other side of the panel and pull them outwards together so that the curtain panel starts to gather in between, forming rounded folds in the process. Stop pulling when the panel contracts enough to reach the width you'd like for your final mounted panels. Knot the strings and tuck away the loose ends in the pocket.
STEP 3: Now spread the pleats evenly by nudging and adjusting the fabric across the strings.
STEP 4: Use a measuring ruler to measure and mark insertion points for the drapery pins. They should ideally be spaced equally across the panel’s finished width.
STEP 5: Insert drapery pins into the header tape at the marked points. Our header tape is 10cm wide with three levels to insert the drapery pins, offering further flexibility to adjust the exact height where you’d like your drapery to 'sit' at top.
STEP 6: Now, insert the pins into the eyelets of the rings on the drapery pole/track. And done!
Before You Start
PRO TIP 1: For the most accurate measurements for curtain lengths and widths, use a steel tape measure. A fabric or plastic tape can stretch over time and will not provide the accurate reading you require to obtain perfect specifications.
PRO TIP 2: Most fabric bolts come in standard widths of 137cm. This means that most non-pinch pleat curtain panels more than 120cm wide and pinch pleat panels more than 50cm wide will have vertical joining hems to achieve the necessary width. These are unavoidable and standard industry practice.
PRO TIP 3: We do *not* require measurements for your windows, frames, poles or tracks. Instead, when ordering from The White Window, please enter the precise final sizes of the ready curtain panels you’d like us to stitch.
PRO TIP 4: Prices on our site are per curtain panel, *NOT* per pair. To get a pair, please purchase 2 units.
PRO TIP 5: If you’re measuring for more than one window, measure each one individually – never assume that your windows are the same size, even if they may look alike.
PRO TIP 6: Refer to our blogs on these three different styles for further guidance on measuring each individually and style notes:
How to Measure Length
Start by measuring the length from the top of the drapery pole to the desired endpoint. Just be careful to measure the length from the top of the pole, not the underside of it. And that's it, that simple. You’ll have the final length to specify in your order for your custom curtains from us.
As to what the endpoint should be, you may choose between any of the standard sizes of short curtains that stop at the sill or go for long curtains that reach the floor. The choice is entirely personal based on your preferences and requirements.
How to Measure Width
Our stylists recommend ordering 2x fullness for back tabs/ rod pocket curtains to make up for a dense gather and rich pleats. However, to maintain the more laidback style of tab top curtains and avoid ‘bunching’ of tabs when curtains are stacked to sides, 1.5x fullness is recommended for tab top drapes.
What do mean by 2x and 1.5x fullness? Let us take you through the steps to measure panel width and explain.
Start by measuring the width of your pole, finial to finial. Then, for 2x fullness, double this number - and this should ideally be the width of your back tab/ rod pocket curtains altogether.
For example, if your pole is 100cm long, then doubling that figure to 200cm, we recommend ordering a pair of curtains with a panel width of (roughly) 100cm each, or a single panel close to 200cm.
Similarly, to achieve 1.5x fullness, simply multiply the pole length by 1.5 to determine the end-panel width. Ideally, this should be the total width for your tab-top curtains.
To explain with an example, if your drapery pole is 100 cm long, we recommend ordering a single drapery panel with a width of about 150 cm (100 x 1.5 = 150cm), or a pair of curtains with a panel width of (roughly) 75cm (150 cm/2) each.
If you are working on a restrictive budget for back tabs/ rod pockets, you may order 1.5x fullness resulting in less dense pleats, without compromising your drapery’s elegance heavily. Again, for tab tops, if you have ordered sheer or semi-sheer fabrics, you may go up to 2x fullness.
However, do note that we advise not to go below 1.5x fullness for any of the styles. If you order a curtain panel with a width that is the same length as your drapery pole, the curtains will hang like a flat sheet when drawn open to cover the entire window. Also, avoid ordering more than 2x fullness for non-sheer and heavy fabrics because that will challenge easy movement on the pole.
How to Hang
Since these styles come with stitched-in tabs/ fabric loops or a drapery sleeve, hanging them is considerably easy.
For back tab curtains, first, flip the curtains downside up so the ‘hidden’ tabs are visible to you.
The next steps are pretty simple - take the drapery pole and thread it through the tabs/ sleeve of the curtains.
For tab tops and back tabs, make sure that the returns (edges) of the curtains should be turned inwards towards the wall or window, and not outwards towards you as you position the first tab. Otherwise, it can result in the fold/pleat direction being reversed, with the back of panels showing on the edges, and light leaking in through the return/edges.
Next, adjust the gather and ruffle of the rod pocket curtains, straighten out and shape the pleats of the tab tops and back tab drapes.
Finally, time to mount the pole in the brackets and tighten any screws to hold the pole in place. Attach any finials, and adjust the curtains again if needed to create a neat fall. That’s it!
Before You Start
- PRO TIP 1: For the most accurate measurements for curtain lengths and widths, use a steel tape measure. A fabric or plastic tape can stretch over time and will not provide the accurate reading you require to obtain perfect specifications.
- PRO TIP 2: Most fabric bolts come in standard widths of 137cm. This means that most non-pinch pleat curtain panels more than 120cm wide and pinch pleat panels more than 50cm wide will have vertical joining hems to achieve the necessary width. These are unavoidable and standard industry practice.
- PRO TIP 3: We do *not* require measurements for your windows, frames, poles or tracks. Instead, when ordering from The White Window, please enter the precise final sizes of the ready curtain panels you’d like us to stitch.
- PRO TIP 4: Prices on our site are per curtain panel, *NOT* per pair. To get a pair, please purchase 2 units.
- PRO TIP 5: If you’re measuring for more than one window, measure each one individually – never assume that your windows are the same size, even if they may look alike.
How to Measure Length
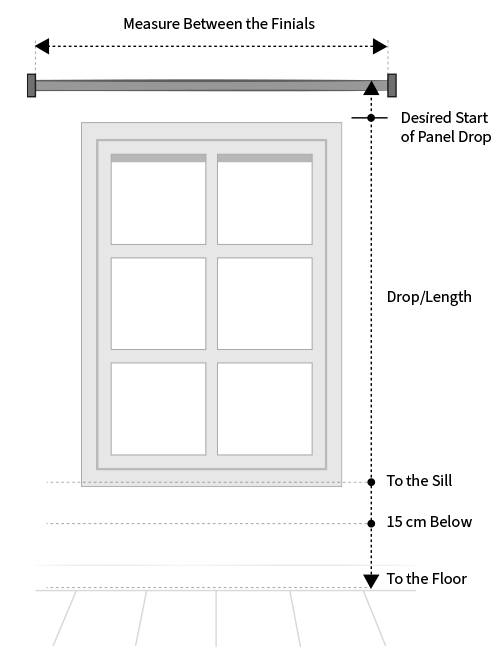
Our tie top curtains are stitched with 25cm long ties on the top. Length specifications for this style are somewhat determined by how much of the tie top loop you’d like to be visible and hang below the pole/ rod. The curtain panel length should therefore be measured from the point where you’d like the panel drop to start up to the desired endpoint.
How to Measure Width
For most tie top curtains, we recommend ordering panels that are double the width of your curtain pole/ track. For example, if your curtain pole/ window is 120cm long, we suggest *two* panels of 120cm *each*, and not two panels of 60cm each. This will get you a luxurious fall/ gather. If your window/pole is 120cm long and you order curtain panels that are also 120cm wide altogether, the drapery will hang flat like a sheet with no gather/ pleats!
We also recommend a relatively higher width (2-3 times the pole width) if ordering sheers or lightweight fabrics such as our linens. These fabrics have low body volume and therefore need more panel width to achieve the same full gather and enhance privacy.
How to Hang
To hang tie-top curtains, all you need to do is knot the tie-strings of the drapes around the curtain rods. But here's the trick: the key here is not just tying the knots but how you tie them. If you want a smooth and flat look, go for wider gaps between the ties. But if you're into those intricate, densely pleated vibes, then you would need to reduce the gap.
You would need to make this consideration while ordering your curtains because it affects how they'll turn out. For those deep, casually hanging pleats, consider wider curtain panels, and if you're after a flatter look, opt for narrower panels.
One more thing – use show-worthy hardware because people will notice the top part of these curtains. Make sure you serve them a good view with hardware that matches up to the elegance of your tie-top curtains.